
Contents
About the Outlook Add-in
The QuickBooks Time and Billing Outlook Add-in works with Microsoft Outlook 2007 and later and provides an easy and convenient way to track time while you work.
You can easily bill for existing appointments and messages, as well as create new time activities on your calendar. When you enter time in Outlook, the add-in automatically sends that time to QuickBooks Time and Billing Manager. You can then submit the time entry to your admin from within Time and Billing Manager. When the administrator approves the submitted time activities online, they get synced to QuickBooks. That time is then available to your admin for billing.
Install the latest version
Make sure Outlook is closed, open your Control Panel and go to Programs (or Add and Remove Programs) to uninstall.
Select TimeAndBillingOutlookAddIn.
Click Uninstall (or Remove).
Click the appropriate link:
The Outlook add-in .zip file downloads.
Extract the contents of the .zip file to your computer.
Run setup.exe and follow the instructions.
Sign in to use the Outlook Add-in
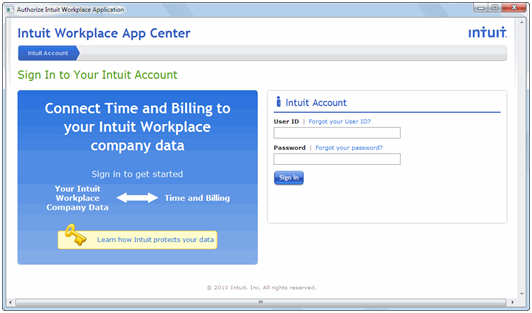
After installing the add-in, you'll be prompted to sign in to your Intuit account. You may also need to sign in when you enter a new time activity.
When the sign-in page appears, enter your Intuit account user ID and password and click Sign In.
-
To authorize the Time and Billing Outlook add-in to access your workplace company data, click Authorize and then click Return to Time and Billing.
You can now add time using Outlook.
Tip: To exit the Outlook add-in, click Log Off on the Enter Time Activity window.
Enter time activities in Outlook
Do one of the following:
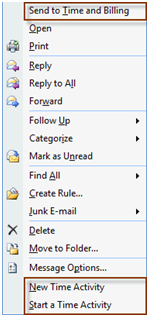
Right-click any cell or item and choose one of the Time and Billing options.
In the Outlook toolbar, click the New Time Activity button.

-
In the Enter Time Activity window, you can enter information about your time activity, such as Company, Customer Job, Service, and Billable status.
If you want to track the time now, click the Start Timer button. Otherwise, enter the Date, Start and Finish times, and Total Duration.
Enter a brief description of the work performed in the Notes section.
Click Save and Close or Save and New.
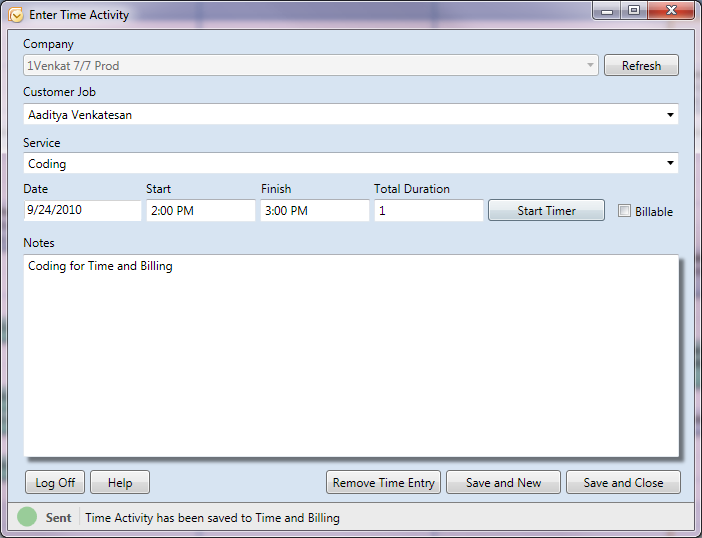
Your time appears in your Outlook calendar and is sent to Time and Billing Manager.
Next steps: Your Outlook time entry turns green after it's sent to Time and Billing Manager. After your time entry is sent, you can return to Time and Billing Manager to submit your time.
Time activity status in Outlook
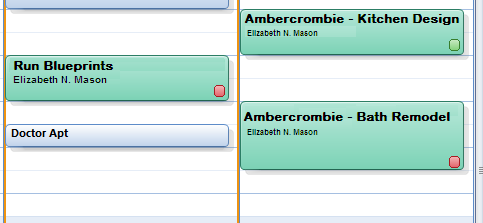
Recorded time activities appear in your Outlook calendar. Time activities have a color box to indicate the status of the activity.
 Red: The timesheet entry is still pending and is not yet synced with Time and Billing Manager.
 Green: The timesheet entry is synced with Time and Billing Manager.
Note: If you're working offline, Outlook will send your pending timesheet entries when you connect back to the Internet.
Add time on the Outlook calendar
Right-click any calendar cell and select New Time Activity. Optionally, from the Outlook toolbar, you can click the New Time Activity button.
The Enter Time Activity window appears. From each drop-down, enter information for Company, Customer Job and Service.
If needed, modify the Date, Start and Finish time, and Total Duration.
Check Billable for billable time, and add descriptive Notes as appropriate.
To save and enter more time, click Save and New.
To save a single entry, click Save and Close.
Your time appears in your Outlook calendar and is sent to Time and Billing Manager.
Next steps: Your Outlook time entry turns green after it's sent to Time and Billing Manager. After your time entry is sent, you can return to Time and Billing Manager to submit your time.
Convert Outlook items
You can convert your Outlook emails, appointments, and tasks to Time and Billing Manager time activities.
Select the Outlook item to convert.
Email: From your Outlook inbox, right-click an email and select Send to Time and Billing.
Appointments: On your Outlook calendar, right-click an appointment and select Send to Time and Billing.
Tasks: On your tasks items pane, right-click a task and select Send to Time and Billing.
The Enter Time Activity window appears. From each drop-down, enter information for Company, Customer Job, and Service Item.
Enter the Date, Start and Finish times, and Total Duration.
Check Billable for billable time, and add descriptive Notes as appropriate.
To save and enter more time, click Save and New.
To save a single entry, click Save and Close.
Your time appears in your Outlook calendar and is sent to Time and Billing Manager.
Note: Your Outlook time entry turns green after it's sent to Time and Billing Manager.
Time a task in Outlook
-
Right-click any task cell and select Start a Time Activity.
-
The Enter Time Activity window appears and the timer starts. Enter information for Company, Customer Job and Service Item.
Check Billable for billable time, and add descriptive Notes as appropriate.
- If you need to pause or take a break, click Stop Timer. To resume, click Start Timer.
When you complete the task, click the Save and New or Save and Close button.
Your time appears in your Outlook calendar and is sent to Time and Billing Manager.
Note: Your Outlook time entry turns green after it's sent to Time and Billing Manager.