Using the Options dialog box to set up program options
You can also use the Options dialog box to select or change all ProSeries Express Edition program options, including those that you cannot select or set up using the Options Setup Wizard.
To open the Options dialog box:
|
1
|
From the Tools menu, select Options.
|
|
2
|
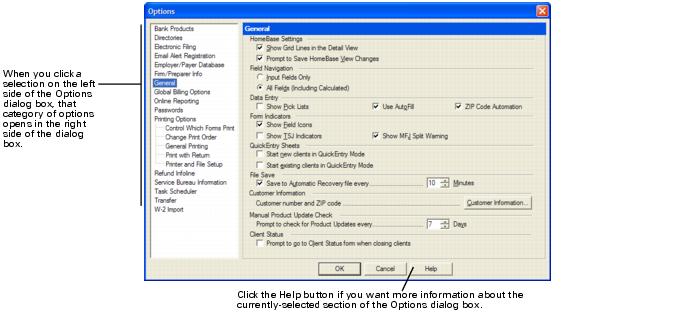
Click the other selections on the left side of the Options dialog box to see the different categories of options.
|
|
4
|
To get help, click the Help button.
|
|
5
|
After you finish making selections, click OK to save them.
|
|
To see the Miscellaneous section, you must open the Options dialog box from a Form 1040 return, a Form 1040NR return, a Form 1120S return, or a Form 1065 return.
|
Directories options
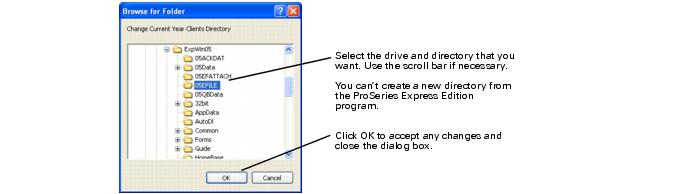
The Directories section of the Options dialog box shows the drive and directory path for the following types of files:
|
Default drive and directory path (Standalone)
|
||

Email Alert Registration options
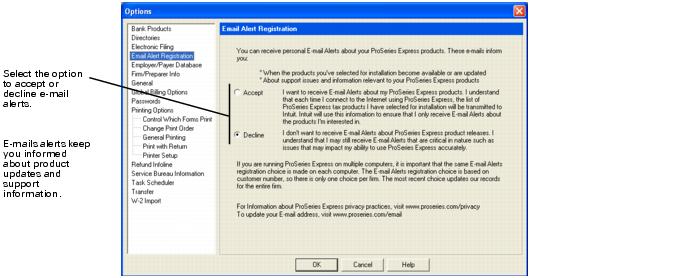
When you installed the ProSeries Express Edition program, you chose to accept or decline personalized e-mail notifications on service and support matters for your specific ProSeries Express Edition products. Use the Email Alert Registration section of the Options dialog box to change your election.
Personalized e-mail notifications:
Entering Employer/Payer Database information
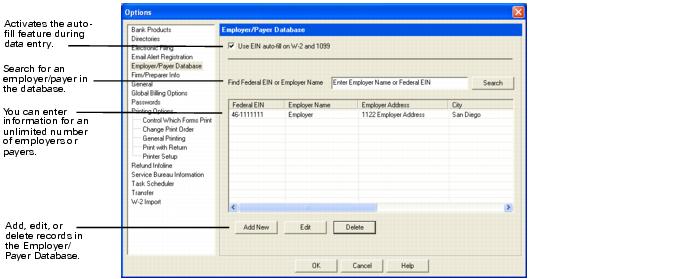
Adding a new employer or payer
|
1
|
Select the Add New button.
|
|
2
|
When the Employer/Payer Database dialog box opens, enter information about the employer or payer.
|
|
3
|
Select Save to save the employer/payer information.
|
You’ll see that the Employer/Payer Database table becomes populated with employer/payer information each time you add a new employer or payer. You can use the Edit button to edit information about an particular employer/payer that you select in the table and the Delete button to delete an individual employer/payer in the table.

Activating the database
To activate or deactivate the Employer/Payer Database, select the Use EIN auto-fill on W-2 and 1099 check box. When you select this option, the ProSeries Express Edition software automatically fills in the name and address information of the employer/payer whenever you enter an Employer Identification Number in a field.
Searching the database
You can search for a federal EIN or employer name that you previously entered in the database by typing the EIN or employer name in the Find Federal EIN or Employer Name box and then selecting the Search button.
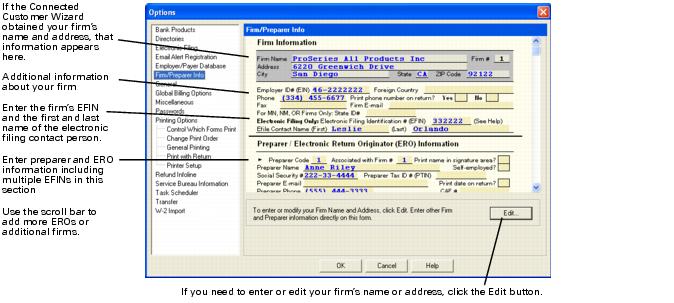
Firm and Preparer Information options
You can enter, edit, and review your firm and paid-preparer information (including Electronic Return Originator (ERO) information) in the following three areas of the Firm/Preparer Information section of the Options dialog box:
This area is for information about each paid preparer.
This area is for information about any additional firms for which you may be preparing returns.
The ProSeries Express Edition program prints the applicable information in the Paid Preparer area on the appropriate forms for each client. ProSeries Express Edition/Electronic Filing software also uses this information. If your firm’s name and address is missing, you can’t print or file returns.
The first time you start the program, ProSeries Express Edition automatically enters your firm’s name and address, preparer information, and other firm information depending on whether your customer information is in our database, and whether you used ProSeries Express Edition 2005.
|
Your computer or the ProSeries Express Edition Admin workstation is connected to the Internet, and your customer information is in our customer database.
|
The Connected Customer Wizard obtains your firm’s name and address from an Intuit Internet server, then enters that information in the Firm Information area of the Firm/Preparer Information section of the Options dialog box.
|
If necessary, edit your firm’s name and address as explained in Editing your firm’s name and address.
|
|
You used ProSeries 2005, and ProSeries Express Edition 2006 can locate the additional information about your firm that you used last year.
|
The ProSeries Express Edition program transfers the additional information about your firm from your 2005 ProSeries Express Edition program to the Firm Information area of the Firm/Preparer Information section of the Options dialog box.
|
If necessary, edit the transferred information as explained in Entering other information about your firm.
|
|
You used ProSeries 2005, and ProSeries Express Edition 2006 can locate the paid preparer information that you used last year.
|
The ProSeries Express Edition program transfers the paid preparer and ERO information from your 2005 ProSeries program to the Firm/Electronic Return Originator (ERO) Information area of the Firm/Preparer Information section of the Options dialog box.
|
If necessary, edit the transferred information as explained in Entering preparer and Electronic Return Originator (ERO) information.
|
|
In Network installations, the Firm/Preparer Information option affects all workstations.
|
|
▪
|
Stand-alone. If the ProSeries Express Edition program is installed for stand-alone use, go to that computer.
|
|
▪
|
Network. If the ProSeries Express Edition program is installed for network use, go to the ProSeries Express Edition Admin workstation.
|
|
Retransfer preparer information. If you want to retransfer preparer information from your 2005 ProSeries Express Edition program, go to HomeBase, go to the File menu, select Transfer, then select Transfer Preparer and Billing Info. Afterward, adjust the information if necessary. For more information, see Transferring firm-related information automatically.
|
|
Billing information. If you transfer billing information for separate ProSeries Express Edition products at separate times, check your preparer information for accuracy after each transfer. This is necessary because the preparer information is transferred from your 2005 ProSeries Express Edition program each time you transfer billing information.
|
Editing your firm’s name and address
|
Firm name and address. The firm name and address must be the primary firm name and location that you use in the normal course of business.
|
To edit the name or address of your firm in the gray-shaded part of the Firm Information area:
|
1
|
Select Edit near the bottom-right corner of the Options dialog box.
|
If product licensing hasn’t occurred, a dialog box instructs you to go to the Tools menu and select License Products.
|
2
|
In the Edit Existing Firm Information dialog box, edit your firm’s name and address.
|
|
3
|
Click OK.
|
|
4
|
Non-significant changes. If you’ve made non-significant changes to your firm’s name and address (such as changing “Dr.” to “Drive” in your firm’s street address), your changes appear in the Firm Information area of the Firm/Preparer Information section of the Options dialog box.
|
|
5
|
Significant changes. If you’ve made significant changes to your firm’s name or address, a dialog box instructs you to call Customer Service at 1‑800‑374‑7317.
|
|
6
|
Click OK to close the instructional dialog box, then click Cancel to close the Edit Existing Firm Information dialog box. When it’s convenient for you, call Customer Service at 1‑800‑374‑7317 during ProSeries Express Edition Customer Service’s hours of operation. (For details about Customer Service’s hours of operation, see Contacting ProSeries Express Edition Customer Service.)
|
A ProSeries Express Edition Customer Service representative will help you update your product licensing information.
Entering your firm’s name and address
|
Firm name and address. The firm name and address must be the primary firm name and location that you use in the normal course of business.
|
If the firm name and address area of the Firm/Preparer Information section of the Options dialog box is blank, either product licensing is required or your product licensing information must be updated. You cannot enter your firm’s name and address directly into the program.
If your firm’s name and address do not appear in the firm name and address area of the Firm/Preparer Information section of the Options dialog box:
|
1
|
When it’s convenient for you, call Customer Service at 1‑800‑374‑7317 during ProSeries Express Edition Customer Service’s hours of operation.
|
|
2
|
You will perform product licensing or will update your product licensing information with the assistance of a ProSeries Express Edition Customer Service representative.
|
After you’ve performed product licensing or updated your product licensing information, you’ll see your firm’s name and address in the firm name and address area of the Firm/Preparer Information section of the Options dialog box.
For more information, see Licensing ProSeries Express Edition products.
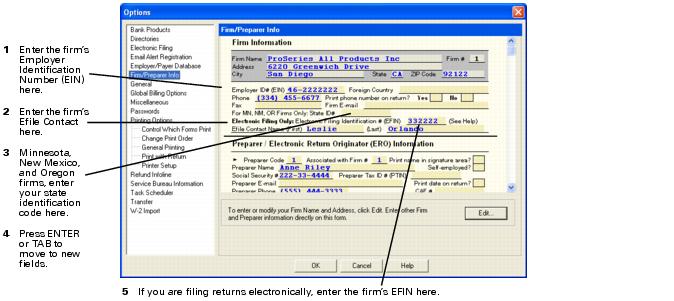
Entering other information about your firm
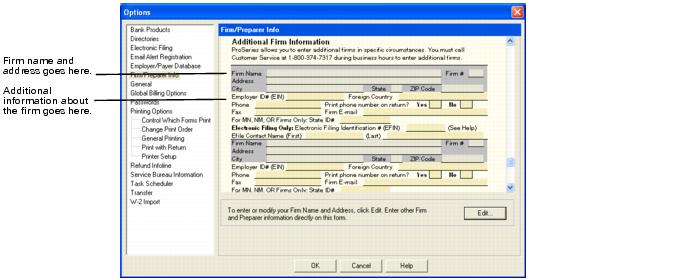
Enter or edit other information about your firm in the region of the Firm Information area that doesn’t have a gray shaded background:
|
Field information. For detailed information about any field in the Firm/Preparer Information section of the Options dialog box, right mouse click on the field, then select the About <Field> command from the shortcut menu that opens.
|
Entering preparer and Electronic Return Originator (ERO) information
To enter preparer information, scroll down to the Preparer/Electronic Return Originator (ERO) Information area and provide the requested information for each preparer who will be using ProSeries Express Edition software.
|
Multiple preparers. If one preparer will be preparing more returns than other preparers using ProSeries Express Edition software, enter the information about that preparer first. Whenever anyone starts a return, the program enters the preparer code for the first preparer by default.
|
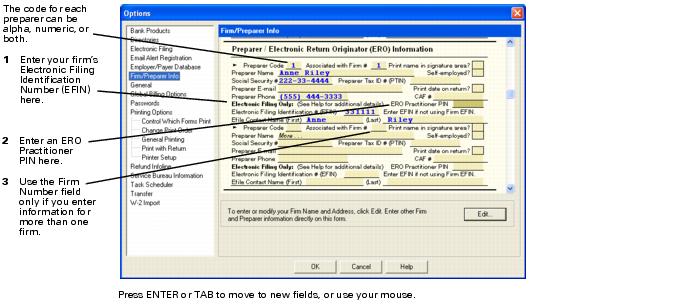
The following table explains each field in the Preparer/Electronic Return Originator (ERO) Information area:
|
To identify each preparer who uses ProSeries Express Edition software, enter a unique preparer code for each preparer. A preparer code can have:
For information about using preparer codes when more than one preparer is using ProSeries Express Edition software, see Using preparer codes on returns.
|
|
|
The default is 1. Use this field if you enter information about additional firms in the Additional Firm Information section.
|
|
|
If you check this box, the program prints the preparer’s name on the Preparer’s Signature line of the tax return. The preparer can then write his or her signature on top of or next to his or her printed name.
|
|
|
If you check this box, the program checks the Self-Employed? box in the Paid Preparer area of the tax return.
Checking the Self-employed? box does not replace the firm’s name with the preparer’s name. The program always prints the firm’s name on the returns for which you are the paid preparer.
|
|
|
This field is for the Preparer’s Tax Identification Number (PTIN). A PTIN is the letter P followed by the eight digit tax identification number. This field is optional. You can use Form W-7P, Application for Preparer Tax Identification Number in the federal products to apply for this number.
|
|
|
This number is assigned by the IRS and is used on forms such as Form 2848, Power of Attorney and Declaration of Representative.
|
|
|
If the preparer plans to participate in the IRS Practitioner PIN program for electronic filing, enter the preparer’s Practitioner PIN (Personal Identification Number). The number can be any five digits with the exception of all zeros (“00000”).
|
|
|
Enter the Electronic Filing Identification Number (EFIN) for your firm to participate in the IRS e-file program.
|
|
|
Printing. To print the information in the Firm/Preparer Information section of the Options dialog box, right mouse click on the form (but not in a data field), then select Print from the shortcut menu that opens.
|
Entering information about additional firms
If more than one firm prepares returns for your clients, Intuit may authorize you to enter information about those firms under limited circumstances. For more information, call ProSeries Express Edition Customer Service at 1‑800‑374‑7317 during business hours. If Intuit authorizes you to enter Additional Firm Information, you can enter, edit, and review information in the Additional Firm Information area the same way that you enter, edit, and review information in the Firm Information area.
|
Multiple locations. If you operate your business in more than one location, each branch office must have a unique Customer Number and a separate copy of the ProSeries Express Edition program.
Shared expenses. If you share an office and other expenses with another firm, you can’t share ProSeries Express Edition software. Each firm must have their own Customer Number and copy of the ProSeries Express Edition program.
|
Firm numbers
The ProSeries Express Edition program enters “1” in the Firm # field of the primary firm, which is the firm whose information opens in the Firm Information area at the top of the Firm/Preparer Information section of the Options dialog box.
If you enter information about additional firms in the Additional Firm Information area, the ProSeries Express Edition program enters “2,” “3,” “4,” and so on in the Field # field of each additional firm.
If the Additional Firm Information area contains information about one or more firms, use the Associated with Firm # fields in the Preparer/Electronic Return Originator (ERO) Information area to identify the appropriate firm for each preparer.
|
Invoices. To include firm and paid-preparer information on itemized invoices, see Setting billing options for all clients.
|
Adding an additional firm or another Electronic Return Originator (ERO)
You'll use the Firm/Preparer Information dialog box to add multiple firms and electronic return originators in the ProSeries Express Edition program. You can also use the Options Setup Wizard to add an additional firm.
|
1
|
Go to the Tools menu and select Options.
|
|
2
|
Select Firm/Preparer Info. The Firm/Preparer Info dialog box opens.
|
|
3
|
In the Firm/Preparer Info dialog box, press the CTRL+SHIFT keys on your keyboard, then click the Edit button. The Additional Firm Information dialog box opens.
|
|
4
|
In the Additional Firm Information dialog box, click the Add button. The Add New Firm Information dialog box opens.
|
|
6
|
Before you close the Add New Firm Information dialog box, call ProSeries Customer Service at 1-800-374-7317 during business hours to obtain a “key.” When the ProSeries customer service agent assigns you a key, make sure that you write down the key and keep it in a safe place. You may need to use the key again in the future. The key enables you to enter additional firm information.
|
|
7
|
Enter the key that you were assigned in the “Key” box, then click OK to close the dialog box. You can now close the Additional Firm Information dialog box.
|
|
8
|
To verify that the new firm information has been added to the ProSeries Express Edition program, select Firm/Preparer Information. You should be able to view the new firm information that you added in the “Additional Firm Information” section. However, if you want to change the Firm/Preparer Information, you'll need to fax a request to ProSeries Customer Service at 1-800-568-7963. You'll want to make sure that you include the new and the old address of the firm/preparer information in your fax.
|
|
9
|
Click OK to save your selections.
|
General options
Online Reports
|
|
Whenever you are connected to the Internet, you have the ability to view online reports that show how your tax preparation business is performing. You can use the online report builder to create and view a variety of reports to monitor your central office and any remote offices of your firm. Some examples of reports that you can create are Preparer Productivity, Site Productivity, and Bank Fees Paid among others.
|
Registering for online reports
Before you can use online reports, you must be a current ProSeries Express Edition customer and be a registered user on the My ProSeries Web site:
|
2
|
Enter your Login Name and Password. If you are not signed up for My ProSeries, select Subscribe Now and follow the on-screen instructions.
|
|
3
|
When you are logged on to My ProSeries.com, go to the Reports section and select Register for Online Reporting and follow the on-screen instructions.
|
|
4
|
|
5
|
Enter a Location Name for each site that you entered. You’ll use the location name to identify the origin of the site-specific report data.
|
|
6
|
Click Continue.
|
Tip: You also can register for online report from the ProSeries Express Edition program. Go to the Reports menu, select Online Reports, then select View Online Reports.
If you are the owner of the firm, you’ll register on My ProSeries.com as the Firm Administrator for your firm. Firm Administrators have the highest level of access and site management authority. In addition, you can assign a Site Administrator for your firm who can manage the online reporting access for particular office location of your firm.
Activating online reports in ProSeries Express Edition
You can set up the new online reporting feature from within the ProSeries Express Edition program in the Options dialog box.
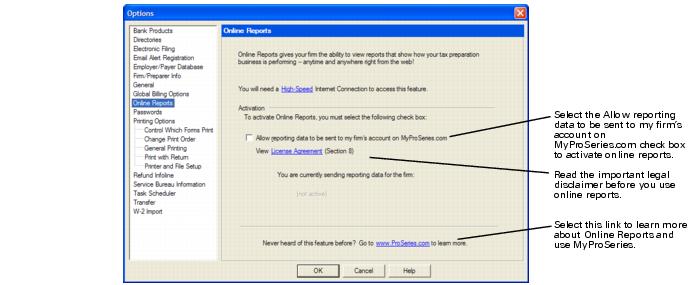
After you have successfully registered for Online Reports on My ProSeries.com, you must activate Online Report data transmissions from each computer that you want to use for online reporting at your firm’s site(s).
To set up Online Reports:
|
1
|
Go to the Tools menu, select Options, then select Online Reports.
|
|
2
|
In Online Reports options, select the Allow reporting data to be sent to my firm’s account on MyProSeries.com check box.
|
Important: When you select this check box, the ProSeries Express Edition software activates online reports.
|
3
|
The ProSeries Express Edition program checks to determine whether or not you are a registered user and then displays a screen to verify the online reporting administrator’s firm name.
|
|
4
|
Once you confirm that each site is correctly associated with your Online Reporting firm administrator’s My ProSeries account, you are asked if you want to transmit report data so that Online Reports can be used immediately.
|
Important: You must complete the in-product activation for each installation of the ProSeries Express Edition software that you want to send report data. For example, if you want to send report data for three separate sites to your account on My ProSeries.com, you must activate the online reports feature on each ProSeries Express Edition installation at each of those sites. A network installation is considered one ProSeries Express Edition installation.
Selecting Password options
You can use client-level passwords to help protect client data. You also can require that preparers enter an Electronic Filing password before electronically transmitting returns or extension forms.
If you want to use client-level passwords or an Electronic Filing password, you must enter a Master password first. The Master password can always be used in place of a client-level password or the Electronic Filing password.
|
Passwords section of the Options dialog box
|
The ProSeries Express Edition program requests that you enter the Electronic Filing password or a client‑level password, but you choose to enter the Master password, and when you select a batch of returns protected by different client-level returns.
|
|
|
Electronic Filing Transmission
|
Passwords section of the Options dialog box
|
The ProSeries Express Edition program requests that you enter the Electronic Filing password before returns or extension forms are transmitted electronically.
|
|
The Save Tax Return dialog box, or the Set Password dialog box
|
The ProSeries Express Edition program requests that you enter the client-level password when you open the client’s file, or when you select the client’s file in HomeBase for an operation such as printing or electronic filing conversion or transmission.
|
|
Last year’s passwords. If the program can locate the Master password and Electronic Filing password that you used with last year’s ProSeries Express Edition program, it transfers them to the Passwords section of this year’s Options dialog box the first time the ProSeries Express Edition program starts this year.
Network. You must enter the Master password from the ProSeries Express Edition Admin workstation.
|
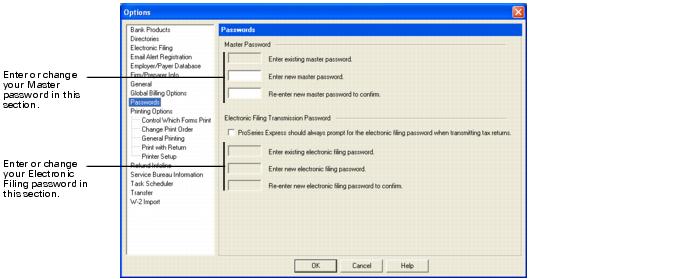
Note the following:
|
▪
|
|
▪
|
To delete your Master password or Electronic Filing password, enter the existing password in the first field, and leave the second and third fields blank.
|
|
Write it down. You are responsible for remembering your Master password. Write it down and store it in a safe place. You can use the Master password to access any client file that is password-protected.
|
|
Master password. You can use the Master password when you select a batch of returns that are protected by different client-level passwords. You can also use it in place of the Electronic Filing password.
|
If you don’t enter a password correctly, the associated return will not convert or transmit. If you have questions about returns that have failed conversion or transmission, check your Conversion log or Transmission log.
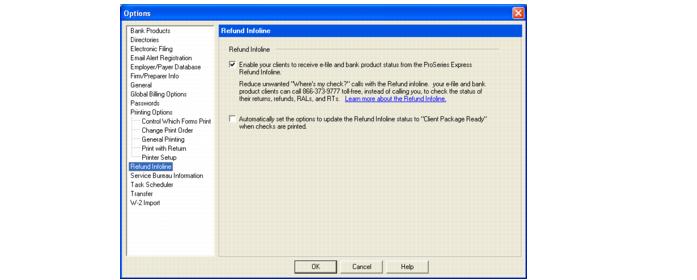
Refund Infoline options
If you want to use the Refund Infoline, you can sign up in one of two ways: (1) you can opt‑in during the Options Setup Wizard when you install ProSeries Express Edition, or (2) go to the Tools menu, select Options, then select Refund Infoline. In the Refund Infoline dialog box, select the Enable your clients to receive e-file and bank product status from the ProSeries Express Refund Infoline check box.
You can have ProSeries Express Edition update the “Client Package Ready” status automatically when you print your client’s refund check. To do so, select the Automatically set the options to update the Refund Infoline status to “Client Package Ready” when checks are printed check box.
|
You can also select (or clear) this option when you click the Print Check button on the toolbar.
|
Refund Infoline telephone number
When you meet with your clients to prepare their returns, you’ll give them the toll-free 1-866-373-9777 telephone number that they can call 24 hours-a-day, seven-days-a-week to get the status of their returns.
Entering Service Bureau information
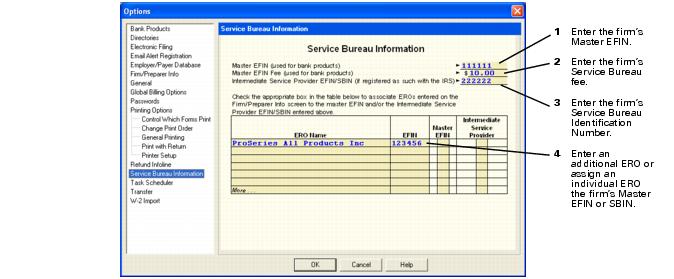
Setting up a Service Bureau or IRS Intermediate Service Provider lets you use the ProSeries Express Edition software to transmit tax returns on behalf of another ERO who has an EFIN but who may or may not electronically file returns for his or her clients.
When your firm operates as a Service Bureau, you can collect fees for your services from the individual ERO’s bank product returns transmitted from your Service Bureau using the ProSeries Express Edition software. If you use Santa Barbara Bank & Trust as your bank products provider, fees are generally split between the tax preparer and the Service Bureau that provided a value-added service for the preparer of the return.
To enter your Service Bureau information:
|
1
|
In the Service Bureau Information dialog box, enter your master EFIN and the service bureau fee that you want to charge. You can enter a service bureau fee without setting up additional EROs or firms.
|
|
2
|
Use the check boxes in the Service Bureau table to assign individual EROs the firm's master EFIN, or the Intermediate Service Provider EFIN or Service Bureau Identification Number (SBIN).
|
|
3
|
If the Electronic Return Originators that you’d like to include are not listed, follow the steps in Adding an additional firm or another Electronic Return Originator (ERO) to add additional firms or Electronic Return Originators (ERO).
|
|
4
|
Click OK.
|
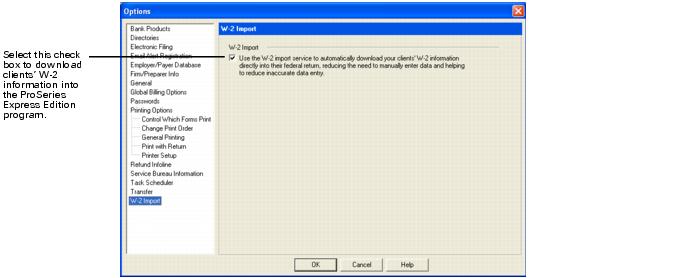
W-2 Import options
W-2 Import reduces the need for you to enter your client’s W-2 information manually. If you are filing federal individual returns electronically and you want to import your clients W-2 information directly into ProSeries Express Edition, select the check box in the W-2 Import section of the Options dialog box to set up the feature.