ProSeries basics - an overview
This section briefly explains many ProSeries features and when you use them. For more detailed information about a specific topic, refer to the applicable chapter of this User’s Guide.
|
Windows standards. ProSeries software includes standard Windows elements such as menus with commands, toolbars with buttons, and dialog boxes. You use these elements in the ProSeries program the way that you use them in other Windows‑based programs.
|
Note the following about standard Windows elements in ProSeries software.
The next sections explain the two main areas of the ProSeries program—HomeBase and the Client Data window.
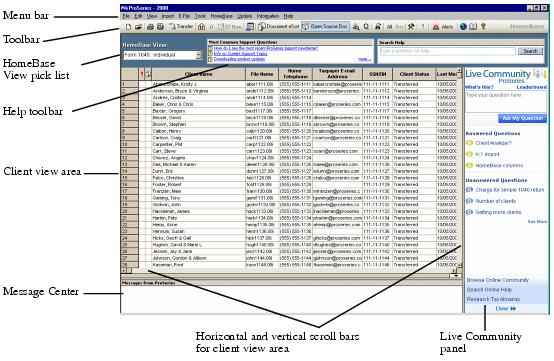
HomeBase
When you start the ProSeries program, you see HomeBase first. ProSeries summarizes information about your client files in HomeBase.
In the following illustration of HomeBase, the Form 1040:Individuals HomeBase view is selected.
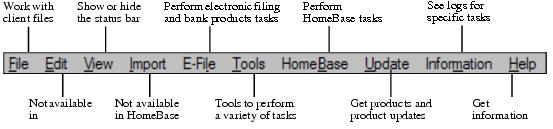
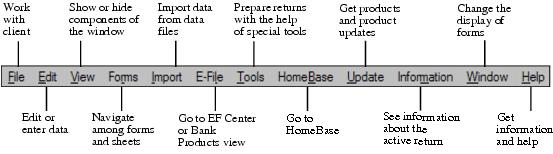
The HomeBase menu bar
The following summarizes the menu bar for HomeBase. The underlined characters are keyboard shortcuts. Hold down the ALT key and type the underlined character to see that menu. If a command on a menu doesn’t apply to the task at hand, it appears dimmed.
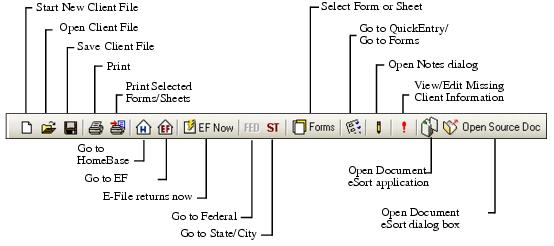
The HomeBase toolbar
Use the buttons on the left half of the HomeBase toolbar to perform the following tasks:
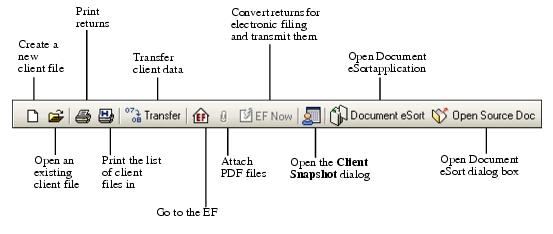
Use the buttons on the right half of the HomeBase toolbar to perform the following tasks:
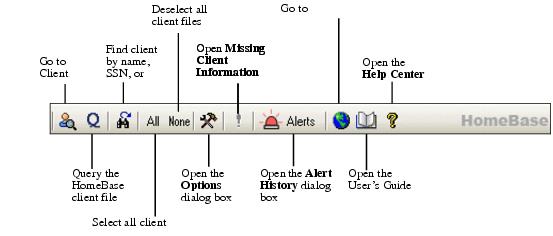
If a button doesn’t apply to the task at hand, it appears dimmed.
Client Data window
When you start a client file or open a previously-saved client file, you see the Information Worksheet for that client in the ProSeries Client Data window.
From the ProSeries Client Data window, you can:
The following illustration shows the Federal Information Worksheet for Form 1040 returns in the Client Data window.

The Client Data window menu bar
The following summarizes the menu bar for the Client Data window. The underlined characters are keyboard shortcuts. Hold down the ALT key and type the underlined character to see that menu. If a command on a menu doesn’t apply to the task at hand, it appears dimmed.
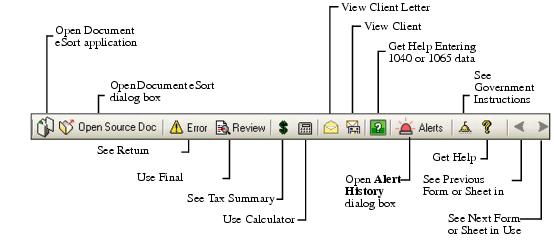
The Client Data toolbar
Use the buttons on the left side of the Client Data toolbar to perform the following tasks:
Use the buttons on the right side of the Client Data toolbar to perform the following tasks:
Entering data on forms in the Client Data window
When you create a new client file or open an existing client file, the Information Worksheet for that type of return appears.
|
Enter basic client data in the data fields on the Information Worksheet
|
1. Select a field that’s shaded light yellow or light red, then type the appropriate data.
2. Press the Enter or Tab key, or use your mouse to move the cursor to the next field.
3. Repeat steps 1 and 2 until you’ve entered all applicable data on the Information Worksheet.
|
|
Go to the toolbar and click the Save the Current Client File button.
|
|
|
Select another form, schedule, worksheet, or other item for data entry
|
|
|
Enter all applicable data on the form, schedule, worksheet, or other item
|
1. Select a field that’s shaded light yellow or light red, then type the appropriate data.
2. Press the Enter or Tab key, or use your mouse to move the cursor to the next field.
3. Repeat steps 1 and 2 until you’ve entered all applicable data on the form, schedule, or worksheet.
|
|
Go to the toolbar and click the Save the Current Client File button.
|
|
ProSeries calculations. As you enter client data, ProSeries calculates totals and automatically flows the appropriate data to the applicable forms.
|
