Transferring client data using the Transfer window
Limitation. You can’t transfer prior-year client data if your 2005 ProSeries Express Edition client files are not available (because they are not stored on a hard drive, server drive, floppy disks, or other storage device).
TurboTax. If you receive a 2006 TurboTax 1040 file from a client, you can transfer the data from that TurboTax file into a 2006 ProSeries Express Edition/1040 file.
|
When to transfer data. Transfer a client’s data before you import data (from Quicken, QuickBooks, or other financial management software) and before you manually enter data on the client’s forms. The transfer procedure erases any data that you previously imported to or entered on a client’s forms.
|
To transfer data from one or more client files:
|
2
|
Click the Transfer Prior Year Client(s) button on the HomeBase toolbar.
|
|
3
|
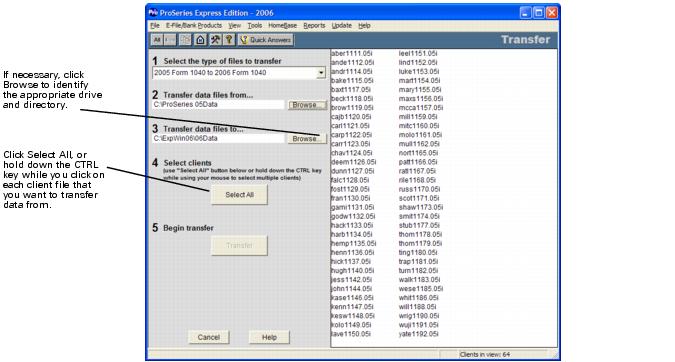
Go to Step 1, Select the type of files to transfer, click the drop-down arrow on the right side of the field, then select the type of transfer that you want from the list that opens.
|

|
Form 706 and Form 709. You might encounter a situation where you transfer client data from a 2005 Form 709 return to a 2006 Form 709 return, then you transfer data from the 2006 Form 709 return to a 2006 Form 706 return.
Form 1040 and Form 709. When you transfer client data from a 2006 Form 1040 return to a 2006 Form 709 return, only client biographical data is transferred. |
|
All 2005 Tax Files to 2006 Tax Files. If you select All 2005 Tax Files to 2006 Tax Files from the Transfer Type list, you can select a batch of client files for more than one type of return. However, you can only transfer a return if you’ve installed the 2006 ProSeries Express Edition product for that type of return.
|
|
4
|
After you select a type of transfer from the Transfer Type list, one of the following occurs:
|
|
●
|
If you used ProSeries Express Edition last year, the ProSeries Express Edition program enters the path to your \EXPWIN05\05DATA directory in the Step 2, Transfer data files from field.
|
|
●
|
The ProSeries Express Edition program lists all the client files in the Step 2, Transfer data files from directory that are appropriate for the type of transfer you selected.
|
|
5
|
To change the directory path that opens in the Step 2, Transfer data files from field, click the Browse button, then select the appropriate drive and directory from the Browse for Folder dialog box that opens.
|
|
You can manually enter the drive and directory path that you want in the Step 2, Transfer data files from field and the Step 3, Transfer data files to field.
|
|
6
|
The ProSeries Express Edition program enters the path to your \ExpWin06\06Data directory in the Step 3, Transfer data files to field.
|
|
Network. You must transfer data to the Primary File Location directory, or a subdirectory of the Primary File Location directory.
|
|
7
|
To select a different drive or directory path for the Step 3, Transfer data files to field, click the Browse button, then select the drive and directory that you want from the Browse for Folder dialog box that opens.
|
|
8
|
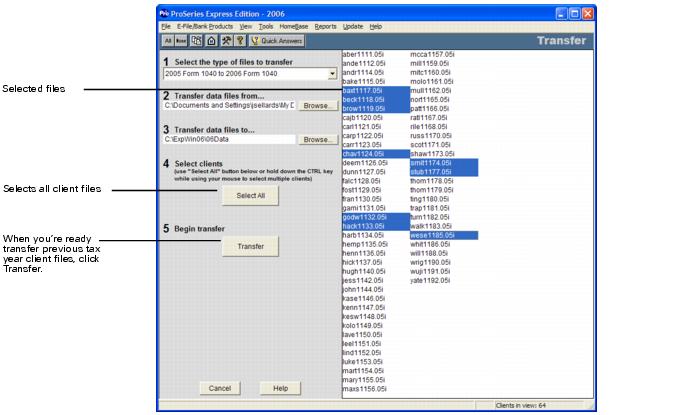
Go to Step 4, Select clients and select the client files you want to transfer.
|
|
●
|
To select all the listed client files, click the Select All button.
|
|
●
|
To select several client files that are in consecutive order, click on the first client file that you want, then hold down the SHIFT key while you click on the last client file that you want.
|
|
●
|
To select several client files that aren’t in consecutive order, hold down the CTRL key while you click on each client file that you want.
|
|
9
|
Go to Step 5, Begin transfer and click the Transfer button.
|
|
10
|
If the Batch Transfer Selection dialog box opens, click OK.
|
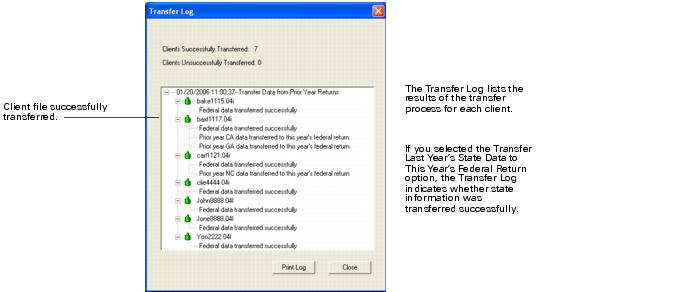
The Batch Transfer Status dialog box keeps you informed. When the ProSeries Express Edition program finishes transferring client data, the Transfer Log dialog box opens.
If you selected Add New Transfer Status Information to Existing Transfer Log in the Transfer section of the Options dialog box, the results shown in the Transfer Log dialog box are cumulative. If you didn’t select this option, the results reflect the most recent transfer only. For more information about this option, see Setting up Transfer options.
If the message File exists, no Overwrite allowed opens, then both of the following situations exist:
|
●
|
You didn’t select Overwrite Existing Client Files in the Transfer section of the Options dialog box when you selected transfer options
|
|
●
|
You are attempting to transfer information to a 2006 ProSeries Express Edition client file that already exists in the Transfer To directory
|
|
Transfer log. To see the transfer log, go to HomeBase, go to the Reports menu, select Logs, then select Transfer Log.
|
