Enabling, setting up, and using the ProSeries Access Rights feature
If you install this year’s ProSeries program on the hard drive of a computer or server that has last year’s ProSeries program with the ProSeries Access Rights feature enabled, the Access Rights settings are transferred from last year’s ProSeries program to this year’s ProSeries program the first time this year’s ProSeries program starts.
If Access Rights settings are transferred from last year’s ProSeries program:
|
▪
|
The Access Rights User Roles, User Names, and User Passwords are transferred from last year’s ProSeries program to this year’s ProSeries program.
|
If Access Rights settings are transferred from last year’s ProSeries program, you must enter a valid Access Rights User Name and User Password to access this year’s ProSeries program. (Valid Access Rights User Names and User Passwords are the Access Rights User Names and User Passwords that were transferred from last year’s ProSeries program.)
If your firm elects to set up and use the ProSeries Access Rights feature, each user must enter a valid user name and password in the ProSeries Login dialog box when he or she starts the ProSeries program. Depending on his or her assigned user role, a user might be denied access to certain ProSeries features. For example, your firm might want to limit access to billing-related features, or it might want to allow only certain preparers to electronically file returns.
The first time you select the Enable/Disable Access Rights Feature command on the Tools menu, the Access Rights Wizard asks whether you want to enable the ProSeries Access Rights feature.
|
▪
|
Enable. If you choose to enable the ProSeries Access Rights feature, you then begin to set up the feature.
|
|
▪
|
Don’t enable. If you choose not to enable the ProSeries Access Rights feature, you can set up a user name and password to help prevent others from enabling the feature in the future.
|
|
A user with the appropriate access rights can enable or disable the Access Rights feature in the future.
|
|
Stand-alone installations. If ProSeries software is installed for stand-alone use on one or more computers, your firm can set up and use the Access Rights feature separately on each computer.
|
|
Network installations. If ProSeries software is installed for network use by multiple computers, your firm can set up and use the Access Rights feature for the entire network.
The Network Administrator and the Access Rights Administrator can be the same person, but they don't have to be. If a task must be performed from the Admin workstation, the person who is going to perform that task must log into the ProSeries program at the Admin workstation. |
User roles, areas of access, and access items
Three essential aspects of the ProSeries Access Rights feature are user roles, areas of access, and access items.
|
▪
|
User roles. The pre-defined user roles are Administrator, Power User, Tax Preparer, and Data Entry.
|
|
▪
|
Areas of access. The areas of access are Client File Maintenance, E-File/Bank Products, Firm Specific Information, HomeBase, Print, Reports, Return Preparation, Tools, and Updates/Install.
|
|
▪
|
Access items. Each area of access consists of specific access items (which are also known as ProSeries features).
|
|
User roles and access items. A user role is defined by the access items the user role can access and the access items the user role can’t access.
|
If your firm elects to use the Access Rights feature, the owner or manager will follow these general steps to set it up. The steps are described in detail in Enabling and setting up the Access Rights feature.
|
1
|
A person that will have Administrator rights enables the Access Rights feature, then enters a user name and password. The program assigns the Access Rights Administrator user role to that user name by default.
|
|
2
|
The new Access Rights Administrator assigns a user name and temporary password to each person who's authorized to use the program.
|
|
3
|
The Administrator also assigns a user role to each user name. The Administrator user role can be assigned to more than one user.
|
|
5
|
Login. The first time users start the program, they enter the user name and temporary password you assigned them into the ProSeries Login dialog box. (For more information, see Logging into the ProSeries program.)
|

|
6
|
New password. Users enter a new password and a password hint in the Enter New Password dialog box. (For more information, see Entering a new password for your Access Rights user name.)
|
|
7
|
Subsequent logins. When users start the program in the future, they enter their user name and new password. If a user doesn’t remember his or her password, he or she can click “Forgot your password?” to see his or her password hint.
|
Valid user name and password required. Users who don't provide a valid user name and password are denied access to the program. If that occurs, a person assigned to the Administrator user role must resolve the situation.
|
8
|
Access to program features. If a user attempts to access a feature that isn’t approved for his or her user role, the program denies access to that feature. After clicking OK in the Access Denied dialog box, the user can continue using program features that he or she is authorized to access.
|
How the Access Rights section is organized
The remaining topics about the Access Rights feature are organized as follows:
Getting started
Access Rights-related tasks that are available to all users
Access Rights-related tasks that are available to some users
Enabling and setting up the Access Rights feature
The Access Rights Wizard helps you enable or disable the Access Rights feature. If you elect to enable the feature, the wizard also helps you set it up.
To start the Access Rights Wizard:
|
1
|
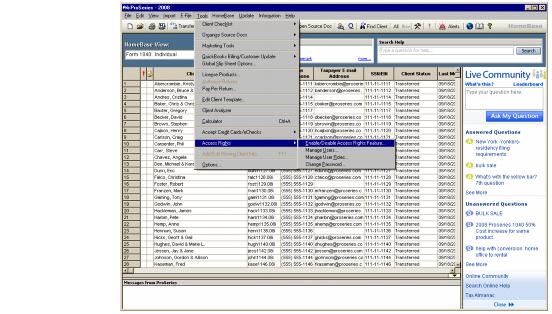
Go to the Tools menu and select Access Rights.
|
|
2
|
Select the Enable/Disable Access Rights Feature command on the Access Rights menu.
|
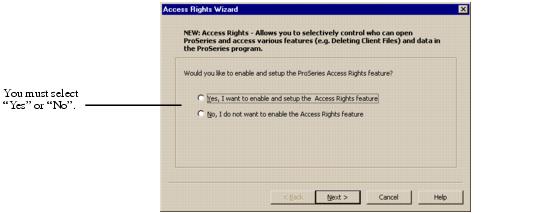
The first Access Rights Wizard dialog box determines whether your firm wants to enable and set up the Access Rights feature.
|
1
|
In the first Access Rights Wizard dialog box, select:
|
|
2
|
Click Next.
|
|
3
|
If you selected “No, I do not want to enable the Access Rights feature,” go to Protecting the Access Rights feature.
|
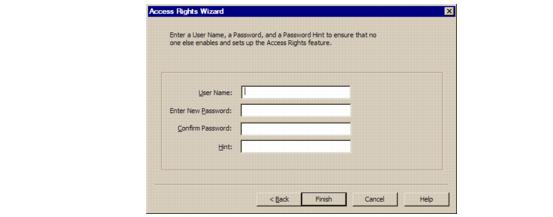
4
|
Enter a user name, password, and password hint in the next Access Rights Wizard dialog box.
|
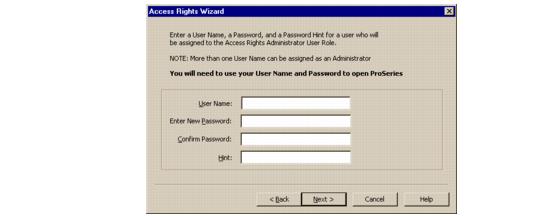
Keep the following in mind as you enter a user name, password, and password hint:
|
●
|
User name. You can use numbers, letters, and/or symbols. The maximum number of characters is 25. User names are not case sensitive.
|
|
●
|
Password. You can use numbers, letters, and/or symbols. The maximum number of characters is 25. Passwords are case sensitive.
|
|
●
|
Hint. Type words, sentences, and/or questions that will remind you of the password in case you don't remember the password when you log into the ProSeries program in the future.
|
|
5
|
Click Next.
|
|
Administrator user role. The program assigns the Administrator user role to the user name that you entered.
|
|
6
|
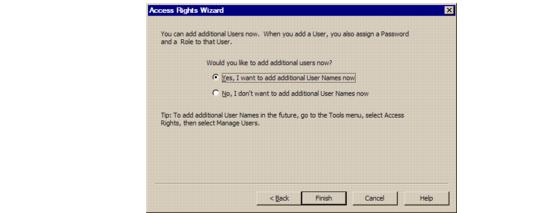
In the next Access Rights Wizard dialog box, select:
|
|
Additional user roles. If you don't add any additional user names, the only way to log into the ProSeries program will be to enter the user name and password that you’ve entered thus far.
To add more user names in the future, go to the Tools menu, select Access Rights, select Manage Users, then click the Add New User button. |
|
7
|
Click Finish.
|
If you selected Yes, continue with step 8.
If you selected No, the Access Rights Wizard ends.
|
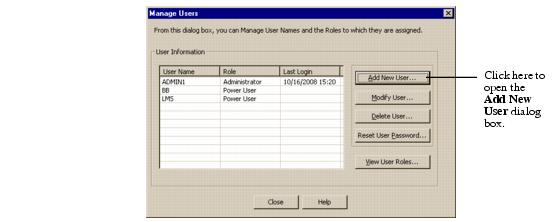
8
|
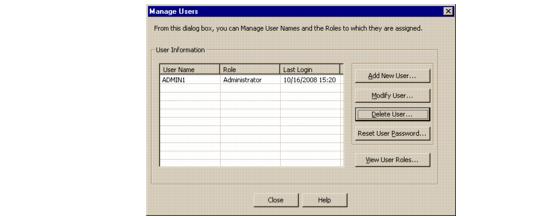
In the Manage Users dialog box, click the Add New User button.
|
|
9
|
In the Add New User dialog box, enter a user name, temporary password, and user role for a person authorized to use the ProSeries program.
|

|
●
|
User name. You can use numbers, letters, and/or symbols. The maximum number of characters is 25. User names are not case sensitive.
|
|
●
|
Password. You can use numbers, letters, and/or symbols. The maximum number of characters is 25. Passwords are case sensitive.
|
|
●
|
User role. The default selections in the User Roles list are Add New Role..., Administrator, Power User, Tax Preparation, and Data Entry.
|
The Add New Role... selection opens the Add New Role dialog box. For instructions on adding a user role, see Adding a new user role.
|
10
|
Click OK to return to the Manage Users dialog box.
|
|
11
|
To add another user name, click the Add New User button.
|
|
13
|
The Manage Users dialog box shows the user names that you’ve entered along with their associated user roles.
|
|
14
|
Click Close in the Manage Users dialog box to end the Access Rights Wizard.
|
|
Adding user names later. To add user names later, see Adding user names.
|
Protecting the Access Rights feature
If you selected “No, I do not want to enable the Access Rights feature” in the first Access Rights Wizard dialog box, a second Access Rights Wizard dialog box asks whether you want to protect the Access Rights feature with a password so no one else can enable it.

|
1
|
In this Access Rights Wizard dialog box, select
|
|
●
|
|
●
|
|
Recommendation. Add a user name and password to lock the Access Rights feature so no one can enable it inadvertently or deliberately in the future. When you do, the ProSeries program requires that user name and password if someone selects the Enable/Disable Access Rights Feature command on the Access Rights menu.
|
|
2
|
Click Finish.
|
|
Enabling the Access Rights feature. To enable the Access Rights feature in the future, see Re-enabling the Access Rights feature.
|
If you elected to not protect the Access Rights feature, the Access Rights Setup Wizard ends.
|
4
|
In the next Access Rights Wizard dialog box, enter a user name, password, and password hint.
|
|
●
|
User name. You can use numbers, letters, and/or symbols. The maximum number of characters is 25. User names are not case sensitive.
|
|
●
|
Password. You can use numbers, letters, and/or symbols. The maximum number of characters is 25. Passwords are case sensitive.
|
|
●
|
Hint. Type words, a sentence, or a question that will remind you of the password in case you don't remember it if you want to enable the Access Rights feature in the future.
|
|
5
|
Click Finish to close the dialog box and end the Access Rights Wizard.
|
Logging into the ProSeries program
This procedure is for users who have been assigned a user name and temporary password by the Administrator. Make sure you have your user name and temporary password before you attempt to log into the program. You will be prompted to create your own password after you log in.
To log into the ProSeries program after the ProSeries Login dialog box opens:
|
1
|
Type your user name into the User Name field.
|
Your user name was created by a person with Access Rights Administrator-level authorization.
|
User names. User names are not case sensitive.
|

|
2
|
Type your password into the Password field.
|
The first time you log into the ProSeries program, you enter the temporary password that was created by the person with Access Rights Administrator-level authorization who created your user name.
When you subsequently log into the ProSeries program, you enter the password that you created for yourself the first time you logged into the ProSeries program. (For more information about that process, see Entering a new password for your Access Rights user name.)
If you forgot the password that you created for yourself and a person with Access Rights Administrator-level authorization created a new temporary password for you, enter that temporary password.
|
Passwords. Passwords are case sensitive.
|
|
3
|
Click OK.
|
|
5
|
If you see a Login Failed dialog box, click OK, then enter your user name and password in the ProSeries Login dialog box, making sure that you type both correctly. Click OK.
|

|
Password hint. Click the Forgot Your Password? link in the ProSeries Login dialog box to see the password hint that you created when you created your password.
|
Entering a new password for your Access Rights user name
The first time you start the ProSeries program, when the ProSeries Login dialog box opens you enter a user name and temporary password that were created by a person with Access Rights Administrator-level authorization.
After you select OK to close the ProSeries Login dialog box and log into the ProSeries program, the Enter New Password dialog box opens so you can enter a new password for your user name along with a password hint.

|
Passwords. When you start the program in the future, you'll enter your user name and your new password (not your temporary password) in the ProSeries Login dialog box.
|
To enter a new password for your user name:
|
1
|
Note the user name in user name field. It should be the user name that you typed in the ProSeries Login dialog box when you started the program.
|
|
2
|
Type a password in the New Password field.
|
|
Passwords. You can use numbers, letters, and/or symbols. The maximum number of characters is 25. Passwords are case sensitive.
|
|
3
|
Type the password again in the Confirm Password field.
|
|
4
|
In the Hint field, type keywords, a sentence, or a question that will remind you of the password.
|
|
Password hints. You can use numbers, letters, and/or symbols. The maximum number of characters is 100.
|
|
5
|
Click OK.
|
Changing the password for your user name
To change the password for your user name:
|
1
|
Go to the Tools menu, select Access Rights, then select Change Password.
|

|
2
|
Note the user name in the User Name field in the Change Password dialog box. It should be the user name that you typed in the ProSeries Login dialog box when you started the program.
|

|
3
|
Type a new password into the Enter New Password field.
|
|
Passwords. You can use numbers, letters, and/or symbols. The maximum number of characters is 25. Passwords are case sensitive.
|
|
4
|
Type the new password into the Confirm New Password field.
|
|
5
|
In the Hint field, type keywords, a sentence, or a question that will remind you of the new password.
|
|
Password hints. You can use numbers, letters, and/or symbols. The maximum number of characters is 100.
|
|
6
|
Click OK.
|
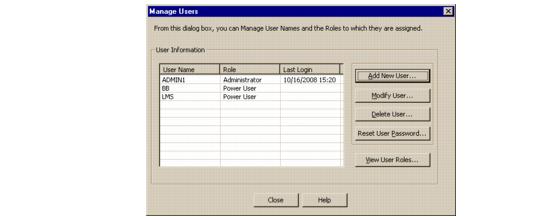
Managing user names, passwords, and user roles
You use commands on the Access Rights menu to manage user names, passwords, and user roles. To open the Access Rights menu, go to the Tools menu and select Access Rights.
Use the commands on the Access Rights menu as follows:
|
Enable/Disable Access Rights Feature
|
||
|
Change the password for the user name that’s logged into the ProSeries program on this computer.
|
|
Administrator user role. The Manage Users and View and Manage User Roles dialog boxes discussed in the next sections are available only if you log into the program using a user name assigned to a user role that’s authorized to access those dialog boxes.
|
Adding user names
|
1
|
Go to the Tools menu, select Access Rights, then select Manage User(s).
|
|
2
|
In the Manage Users dialog box, click the Add New User button.
|
|
3
|
In the Add New User dialog box, enter appropriate information and select a user role appropriate for the user.
|

|
●
|
User name. You can use numbers, letters, and/or symbols. The maximum number of characters is 25. User names are not case sensitive.
|
|
●
|
Password. You can use numbers, letters, and/or symbols. The maximum number of characters is 25. Passwords are case sensitive.
|
|
●
|
User role. The default selections in the User Roles list are Add New Role..., Administrator, Power User, Tax Preparation, and Data Entry.
|
The Add New Role... selection opens the Add New Role dialog box. For instructions on adding a user role, see Adding a new user role.
|
User names. You might want to enter the user's name, initials, employee number, or other information as the basis for the user name.
Passwords. The first time the user logs into the ProSeries program, he or she will enter a new password that will replace the temporary password. |
You'll probably also want to let each person know that:
|
●
|
Users enter their user name and temporary password the first time they start the program.
|
|
●
|
After users log into the program the first time, they enter a new password that they will subsequently use when starting the program.
|
|
●
|
When users attempt to access a feature their user role isn’t authorized to access, they see an Access Denied dialog box.
|
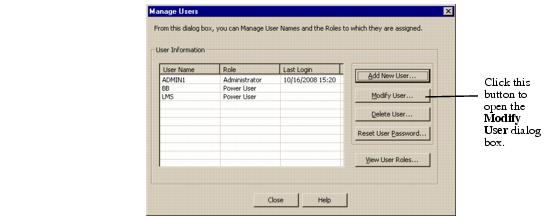
Changing a user name or selecting a different user role
|
1
|
Go to the Tools menu, select Access Rights, then select Manage User(s).
|
|
2
|
In the Manage Users dialog box, select a user name, then click the Modify User button.
|
|
User names. You can’t modify information for the user name that you used to log into the ProSeries program.
|
|
3
|
In the Modify User dialog box, edit the information in the User Name field if applicable.
|

|
4
|
Select the User Role field, then select a user role from the User Role list.
|
|
5
|
Click OK.
|
|
7
|
If you changed the user role, you might want to let the person know his or her new user role.
|
Deleting a user name
|
1
|
Go to the Tools menu, select Access Rights, then select Manage User(s).
|
|
2
|
In the Manage Users dialog box, select the user name, then click the Delete User button.
|
|
3
|
In the Confirm Delete dialog box, click Yes.
|

|
Can Not Delete User. If the user name you're trying to delete is currently in use, the Can Not Delete User dialog box opens. Click Yes to close the dialog box. Wait until the person using the user name has logged out, then delete the user name.
|
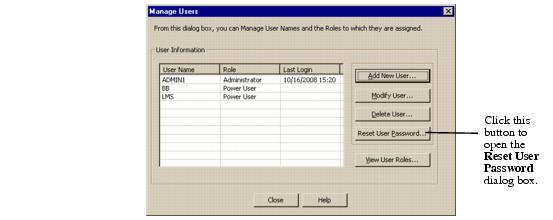
Resetting a user’s password
If a user forgets his or her password (and the password hint hasn't helped him or her remember the password), you can enter a new temporary password for that user name:
|
1
|
Go to the Tools menu, select Access Rights, then select Manage User(s).
|
|
2
|
In the Manage Users dialog box, select the user name, then click the Reset User Password button.
|
|
3
|
Enter a temporary password in the Temporary Password field, then enter the same password in the Confirm Temporary Password field.
|

|
4
|
Click OK.
|
|
5
|
Let the appropriate person know about the new temporary password, and that he or she will need to enter a new password the next time he or she logs into the ProSeries program.
|
|
6
|
You might want to remind the person that he or she will need to enter a new password (which will replace the new temporary password) the next time he or she logs into the ProSeries program.
|
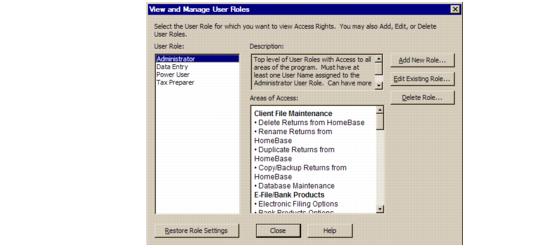
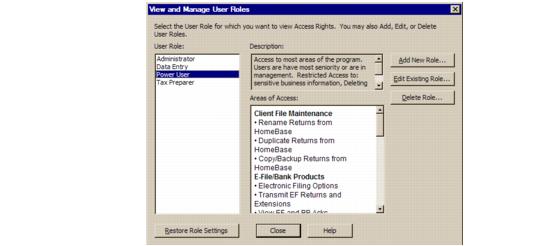
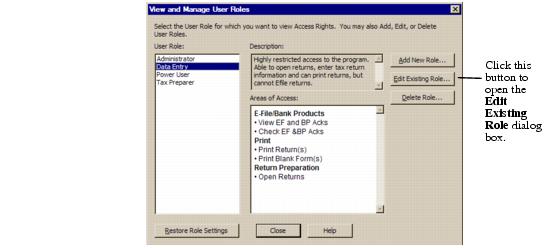
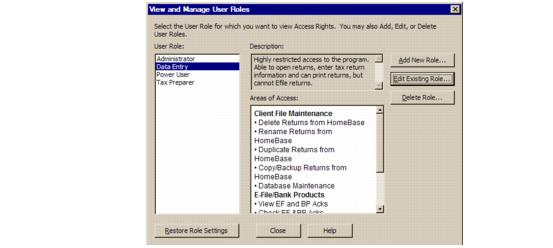
Viewing information about Access Rights user roles
To view information about the user roles currently being used:
|
1
|
Go to the Tools menu, select Access Rights, then select Manage User Roles to open the View and Manage User Roles dialog box.
|
|
View User Roles button. Clicking the View User Roles button in the Manage Users dialog box opens the View and Manage User Roles dialog box.
|
|
2
|
In the View and Manage User Roles dialog box, select a user role in the User Role column.
|
In the next illustration, the Administrator user role is selected.
|
3
|
Read the user role description in the Description field. Use the scroll bar when appropriate.
|
In the next illustration, the Power User user role is selected.
|
4
|
Review the access items listed in the Areas of Access column. Use the scroll bar when appropriate.
|
In the next illustration, the Tax Preparer user role is selected.
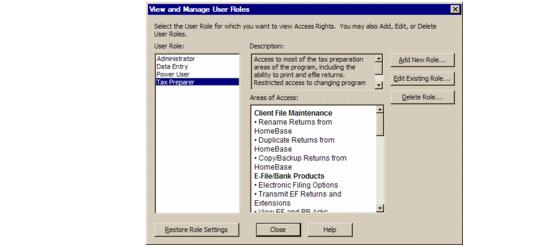
|
5
|
Click Close to close the View and Manage User Roles dialog box.
|
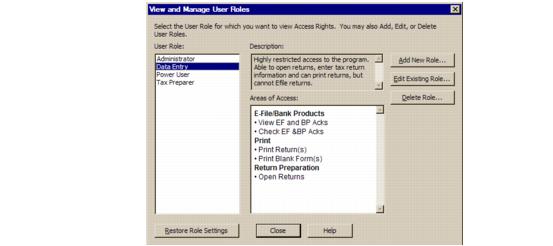
In the next illustration, the Data Entry user role is selected.
Adding a new user role
|
1
|
Go to the Tools menu, select Access Rights, then select Manage Role(s) to open the View and Manage User Roles dialog box.
|
|
View User Roles button. Clicking the View User Roles button in the Manage Users dialog box opens the View and Manage User Roles dialog box.
|
|
2
|
In the View and Manage User Roles dialog box, click the Add New Role button.
|
|
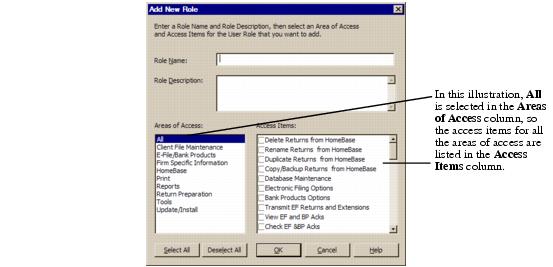
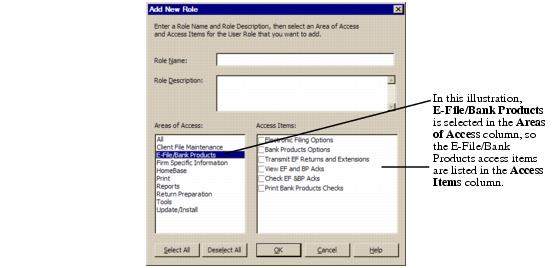
3
|
In the Add New Role dialog box, enter a name for the new user role in the Role Name field.
|
|
4
|
Enter a description of the new user role in the Role Description field.
|
|
5
|
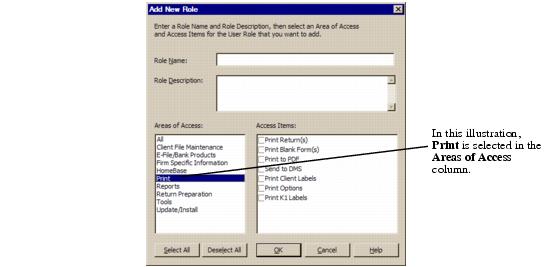
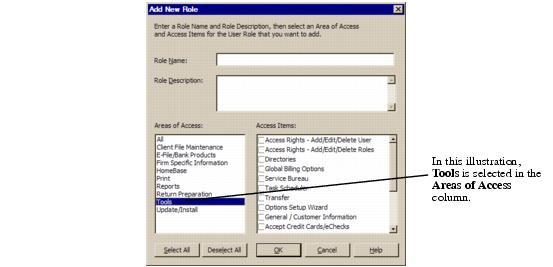
Select an area in the Area of Access column, then check the access items in the Access Items column that you want assigned to this user role.
|
Note that access items are also known as features.
|
Select All and Deselect All buttons. Use these buttons to select or deselect every access item in the Access Items column.
|
|
7
|
When you finish defining the new user role, click OK to save the new user role.
|
|
Cancel button. If you click Cancel, the program doesn't save the new user role.
|
Editing access items for an existing user role
|
1
|
Go to the Tools menu, select Access Rights, then select Manage Role(s) to open the View and Manage User Roles dialog box.
|
|
View User Roles button. Clicking the View User Roles button in the Manage Users dialog box opens the View and Manage User Roles dialog box.
|
|
2
|
In the View and Manage User Roles dialog box, select a user role in the User Role column.
|
|
Administrator user role. You can’t edit the access items for the Administrator user role.
|
|
3
|
Select the Edit Existing Role button.
|
|
4
|
The Edit Existing Role dialog box reminds you that changes to the user role will apply to all user names that are assigned to the user role. Click OK to proceed.
|

|
5
|
In the next Edit Existing Role dialog box, select an area of access in the Areas of Access column.
|
|
6
|
Select the access items in the Access Items column that you want users assigned to this user role to be able to access.
|
|
Select All and Deselect All buttons. Use these buttons to select and deselect every access item in the Access Items column.
|
|
8
|
When you finish editing the access items for the user role, click OK to save the revised definition of the user role.
|
|
Cancel button. If you click Cancel, the program doesn't save the revised definition of the user role.
|
|
Affected users. When you edit a user role, the changes affect all users who log into ProSeries with a user name assigned to that user role.
|
Deleting a user role
|
1
|
Go to the Tools menu, select Access Rights, then select Manage User Role(s).
|
|
2
|
In the View and Manage User Roles dialog box, go to the User Role column and select the user role that you want to delete.
|
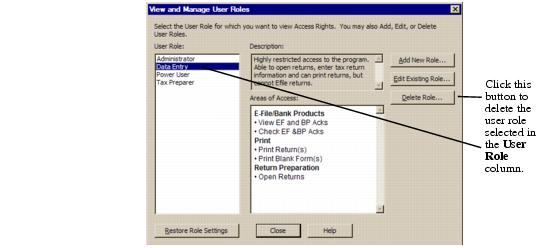
|
3
|
Click the Delete Role button.
|
The program deletes the user role unless it’s assigned to one or more user names, in which case a Cannot Delete User Role dialog box opens. Click OK to proceed.

In the Are you sure? dialog box, click Yes.

The program deletes the user role.
Restoring the default settings for a user role
To restore the default settings for an Access Rights user role that’s been edited:
|
1
|
Go to the Tools menu, select Access Rights, then select Manage Role(s).
|
|
2
|
In the View and Manage User Roles dialog box, select the appropriate user role in the User Role column.
|
|
3
|
Click the Restore Role Settings button.
|
|
4
|
Click OK to close the View and Manage User Roles dialog box.
|
Disabling the Access Rights feature
|
1
|
Go to the Tools menu, select Access Rights, then select Enable/Disable Access Rights Feature.
|

|
2
|
In the Are you sure? dialog box, click Yes.
|
The program disables the Access Rights feature, so Enable/Disable Access Rights Feature is the only command that’s available on the Access Rights menu.
|
Access Rights information saved. If you disable the Access Rights feature, the ProSeries program saves the Access Rights user role, user name, and password information so it’s available if the feature is re-enabled in the future.
|
Re-enabling the Access Rights feature
To re-enable the Access Rights feature after it’s been disabled:
|
1
|
Go to the Tools menu, select Access Rights, then select Enable/Disable Access Rights Feature.
|

|
2
|
In the ProSeries Login dialog box, enter a user name and password.
|
|
Administrator user role. The user name you enter must be assigned to the Administrator user role. Re-enabling the Access Rights feature requires Administrator-level authorization.
|
|
3
|
In the Are you sure? dialog box, click Yes.
|
|
4
|
The program re-enables the Access Rights feature. All commands on the Access Rights menu are available to users who log into the program using a user name assigned to a user role with appropriate authorization.
|
|
Access Rights information saved. If you re-enable the Access Rights feature, the Access Rights user role, user name, and password information that the ProSeries program saved when the feature was disabled becomes available.
|
