| Preparing and printing electronic filing reports |
You can create and print electronic filing reports for:
The following electronic filing reports are available:
To prepare an electronic filing report:
- Go to the toolbar and click the EF Center button.

- In the HomeBase EF Center, select the client returns that you want to include in the report.
- To select consecutive client files, click the first client file, then hold down the SHIFT key when you click the last client file.
- To select non-consecutive client files, hold down the CTRL key while you click each client file.
- Go to the File menu and choose Electronic Filing.
- From the Electronic Filing menu, choose Reports.
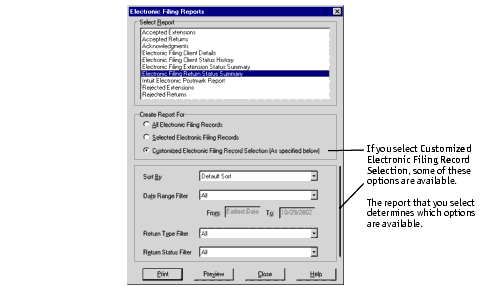
- In the Electronic Filing Reports dialog box, select the type of report that you want in the Select Report area.
- Go to the Create Report For section, then select All Electronic Filing Records, Selected Electronic Filing Records, or Customized Electronic Filing Record Selection.
- If you selected Customized Electronic Filing Record Selection in step 6, continue with step 8. Otherwise, go to step 10.
- Go to the Sort By field and select the way that you want the information sorted, if applicable, then go to the Date Range Filter list and specify status dates, if applicable.
- When applicable, select the return type filter and return status filter:
- Return Type Filter — This allows you to run reports by all returns, just federal returns, just state returns, or specific state returns.
- Return Status Filter — This allows you to run reports for all return status types or any single return status. For a list of return status types, see Program Help.
- To view the report before you print it, click Preview.
- When the report appears in the Preview window, you can zoom in, view additional pages, and print the report.
- Click Close to return to the Electronic Filing Reports dialog box.
- In the Electronic Filing Reports dialog box, click Print to print the report.
If you don’t select any returns, the report automatically includes all returns available for your report criteria.

|
Tip:
|
Sorting and filtering. Each type of report uses unique sorting and filtering functions. When you select a report, you see the results of the sorting and the filters designed for that report.
|
